

안내
Fuzzing101은 퍼저, 퍼징을 처음 시작하는 사람, 실제 소프트웨어 프로그램에서 퍼징을 통해 취약점을 찾고
싶은 사람들에게 추천되고 있고, github에서 많은 fork수를 달성할 정도로 검증된 퍼징 연습 환경입니다.
Fuzzing101에는 여러가지 10개의 Exercies가 있으며 본 포스트에선 Exercies 1을 다룹니다.
Exercise 1은 Xpdf의 1-day 취약점을 분석할 것이며, CVE번호는 CVE-2019-13288입니다.
추가로 이번 실습에서 사용되는 단어들을 간단히 정리하고 넘어가겠습니다.
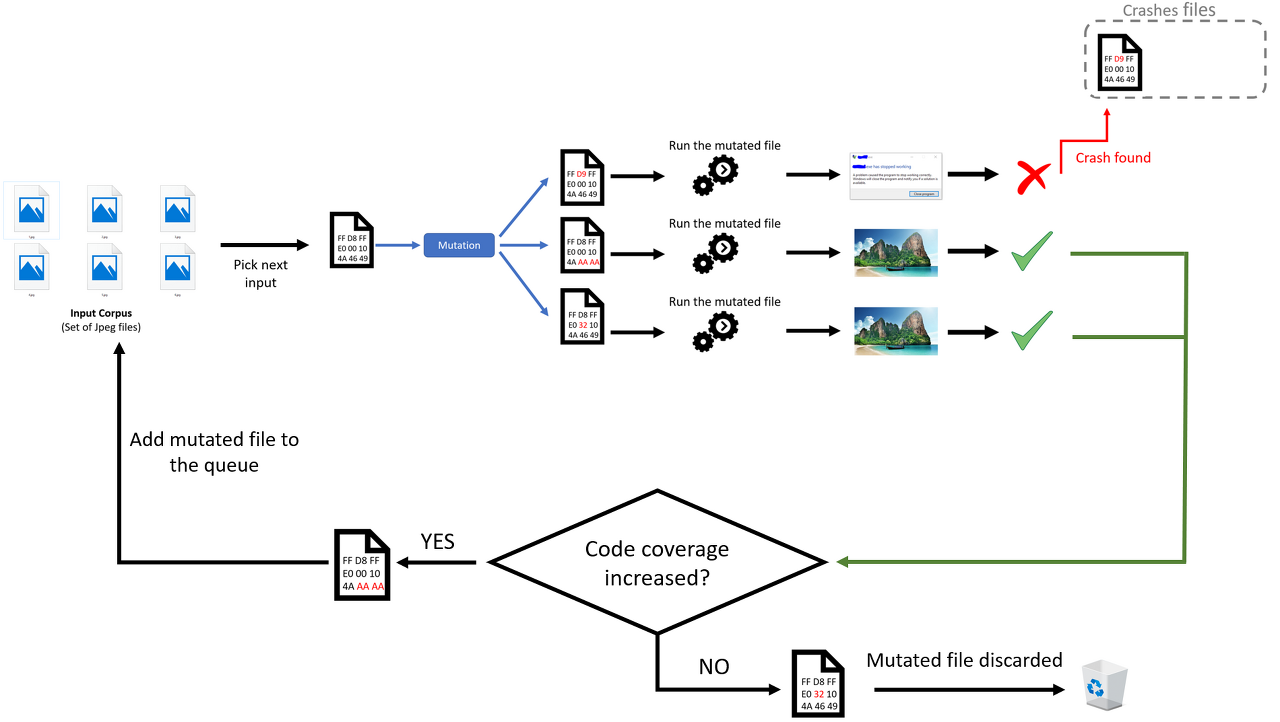
- Fuzzer: 소프트웨어 보안 테스트 도구 중 하나로 애플리케이션의 취약점이나 예외 동작을 찾기위해 입력 값을
자동으로 생성하고 실행하는 프로그램 - Coverage-guided-fuzzer: 입력 과정에서 코드 커버리지 정보를 사용하여 효율적으로 탐색을 진행하는 퍼저입니다.
특히, 이전에 탐색하지 않은 코드 또는 실행 경로를 우선적으로 탐색할 수 있어 새로운 취약점을
발견할 가능성을 높입니다. 일반적으로는 커버리지 도구와 결합되어 사용됩니다. 예를들어 LLVM의 "SanitizerCoverage" 도구나 AddressSanitizer 등이 있습니다.
Code_coverage
코드 커버리지는 소프트웨어 테스트의 한 지표로 테스트가 프로그램의 어느 부분을 탐색하는지, 어느 정도의 코드를 실행하는지를 확인하는데 사용됩니다. 코드 커버리지는 주로 테스트 수행 시 실행되는 코드의 라인, 분기, 함수등의 단위를 측정합니다. 코드 커버리지가 높을수록 프로그램의 다양한 부분을 탐색하고, 잠재적 버그나 취약점을 발견하는데 도움이 됩니다.- Bare-metal: 하드웨어 상에 어떤 소프트웨어도 설치되어 있지 않은 상태를 말합니다.
사전 준비 사항
Ubuntu 20.04.2 LTS(VMware or Virtualbox)
꼭 위 환경일 필요는 없지만, 버전 및 OS에 따라 퍼징 결과가 달라질 수 있기 때문에 맞춰주면 좋습니다.또한 가상화된 시스템이 아닌 베어 메탈 하드웨어에서 AFL을 실행하는 것이 다른 퍼징 결과를 피하는정확한 방법입니다.
절차
가장 먼저 퍼징 타겟을 다운 받기 위해 프로젝트의 새 디렉토리를 만듭시다.
또한 보다 완벽한 환경을 준비하려면 make와 gcc가 필요하므로 build-essential도 설치받아 줍니다.
cd $HOME
mkdir fuzzing_xpdf && cd fuzzing_xpdf/
sudo apt install build-essential
이제 아래 명령어들을 통해 Xpdf 3.02를 다운받고 빌드해봅시다.
wget https://dl.xpdfreader.com/old/xpdf-3.02.tar.gz
tar -xvzf xpdf-3.02.tar.gz

cd xpdf-3.02
sudo apt update && sudo apt install -y build-essential gcc
./configure --prefix="$HOME/fuzzing_xpdf/install/"
make
make install빌드를 테스트하기 위해 이번 실습을 위한 예제 PDF파일을 다운로드 받겠습니다.
다운 받은 후 pdfinfo 바이너리를 통해 출력을 확인해봅시다.
cd $HOME/fuzzing_xpdf
mkdir pdf_examples && cd pdf_examples
wget https://github.com/mozilla/pdf.js-sample-files/raw/master/helloworld.pdf
wget http://www.africau.edu/images/default/sample.pdf
wget https://www.melbpc.org.au/wp-content/uploads/2017/10/small-example-pdf-file.pdf

$HOME/fuzzing_xpdf/install/bin/pdfinfo -box -meta $HOME/fuzzing_xpdf/pdf_examples/helloworld.pdf아래 사진과 같이 나오면 성공입니다.

이제 AFL fuzzer를 다운 받을 시간입니다.
로컬 설치와 도커 이미지를 통한 설치 방법 총 2가지가 존재하지만, 간편한 로컬 설치로 진행하겠습니다.
혹시라도 도커 이미지를 통한 다운로드 방법이 궁금하신 분들은 출처에 있는 원문을 참고하시길 바랍니다.
다음 명령어로 로컬 설치를 진행하겠습니다.
sudo apt-get update
sudo apt-get install -y build-essential python3-dev automake git flex bison libglib2.0-dev libpixman-1-dev python3-setuptools
sudo apt-get install -y lld-11 llvm-11 llvm-11-dev clang-11 || sudo apt-get install -y lld llvm llvm-dev clang
sudo apt-get install -y gcc-$(gcc --version|head -n1|sed 's/.* //'|sed 's/\..*//')-plugin-dev libstdc++-$(gcc --version|head -n1|sed 's/.* //'|sed 's/\..*//')-dev


//AFL++ Check out & build
cd $HOME
git clone https://github.com/AFLplusplus/AFLplusplus && cd AFLplusplus
export LLVM_CONFIG="llvm-config-11"
make distrib
sudo make install모두 정상적으로 설치되었다면 아래와 같이 afl-fuzz 명령어를 실행하실 수 있습니다.
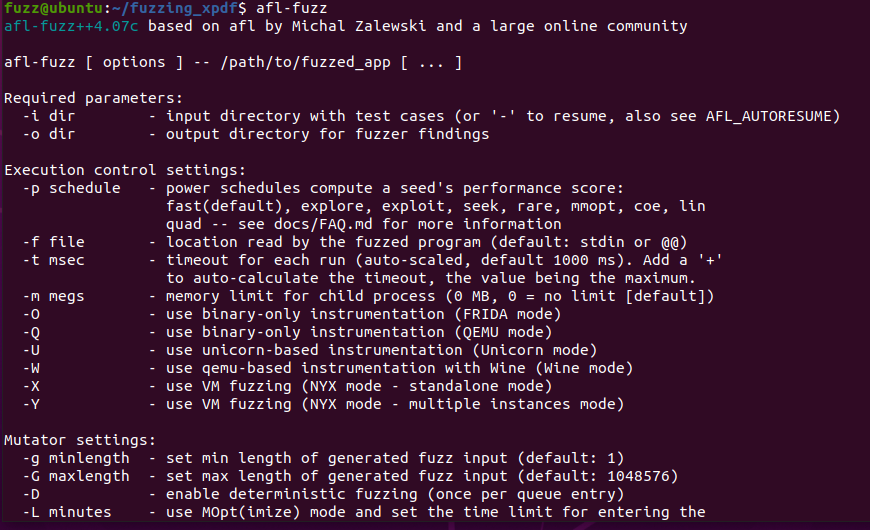
이제 준비는 끝이 났습니다. 지금까지 설치 및 빌드에 사용했던 파일과 실행 파일을 아래 명령어로 정리합니다.
rm -r $HOME/fuzzing_xpdf/install
cd $HOME/fuzzing_xpdf/xpdf-3.02/
make clean이후 afl-clang-fast 컴파일러를 통해 xpdf를 빌드합시다.
export LLVM_CONFIG="llvm-config-11"
CC=$HOME/AFLplusplus/afl-clang-fast CXX=$HOME/AFLplusplus/afl-clang-fast++ ./configure --prefix="$HOME/fuzzing_xpdf/install/"
make
make install최종적으로 아래 명령어를 통해 fuzzer를 실행해봅시다.
afl-fuzz -i $HOME/fuzzing_xpdf/pdf_examples/ -o $HOME/fuzzing_xpdf/out/ -s 123 -- $HOME/fuzzing_xpdf/install/bin/pdftotext @@ $HOME/fuzzing_xpdf/output옵션은 아래와 같습니다.
- -i: 입력 케이스를 넣어야하는 디렉토리
- -o: AFL++가 변경되 ㄴ파일을 저장할 디렉토리
- -s: 사용할 정적 무작위 시드
- @@: AFL이 각 입력 파일 이름으로 대체할 자리 표시
만약 아래와 같은 오류가 발생한다면, 다음 명려어를 통해 해결하시길 바랍니다.
"Hmm, your system is configured to send core dump notifications to an external utility..."
sudo su
echo core >/proc/sys/kernel/core_pattern
exit
명령 실행 후 조금 기다리면 아래와 같이 퍼저가 돌아가는 것을 확인할 수 있습니다.
첫 퍼징을 축하드립니다!

Analize(EZ)
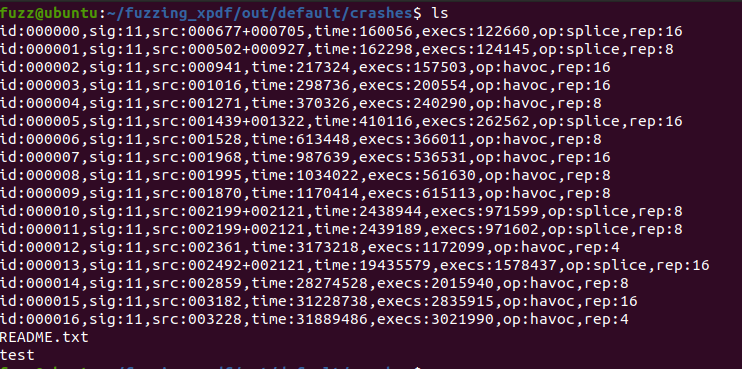
자, 어느정도 퍼저를 돌리다가 중단하고 /crashes 디렉토리에 들어가보면 여러 크랙된 파일을 볼 수 있다.
이 크랙된 파일 중 하나를 gdb를 통해 열고 run을 해보면, Segmentation fault가 뜨는 것을 볼 수 있다!
이는 crashed된 파일 즉 fuzzer를 돌린 대상파일에 취약점이 있다는 뜻입니다.
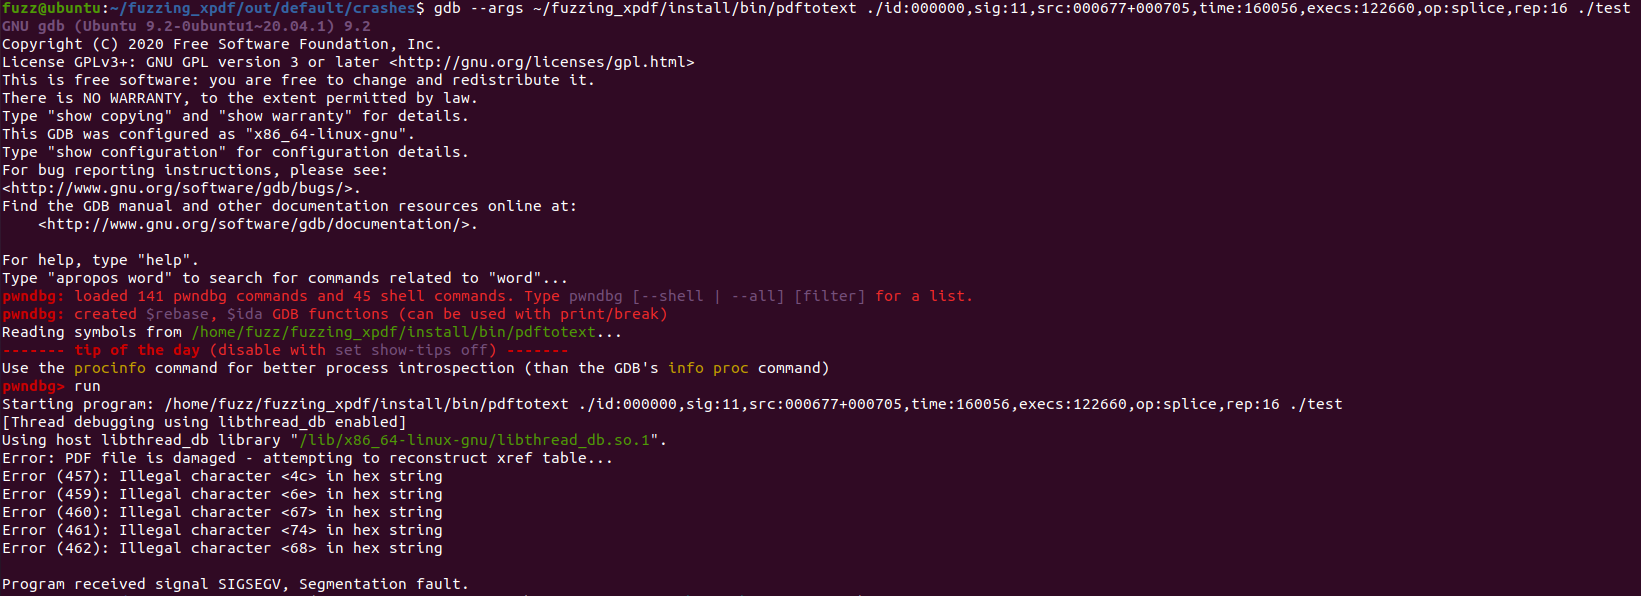
어떤 이유 때문에 Segmentation fault가 뜨는지 bt(backtrace)를 통해 확인해보자!
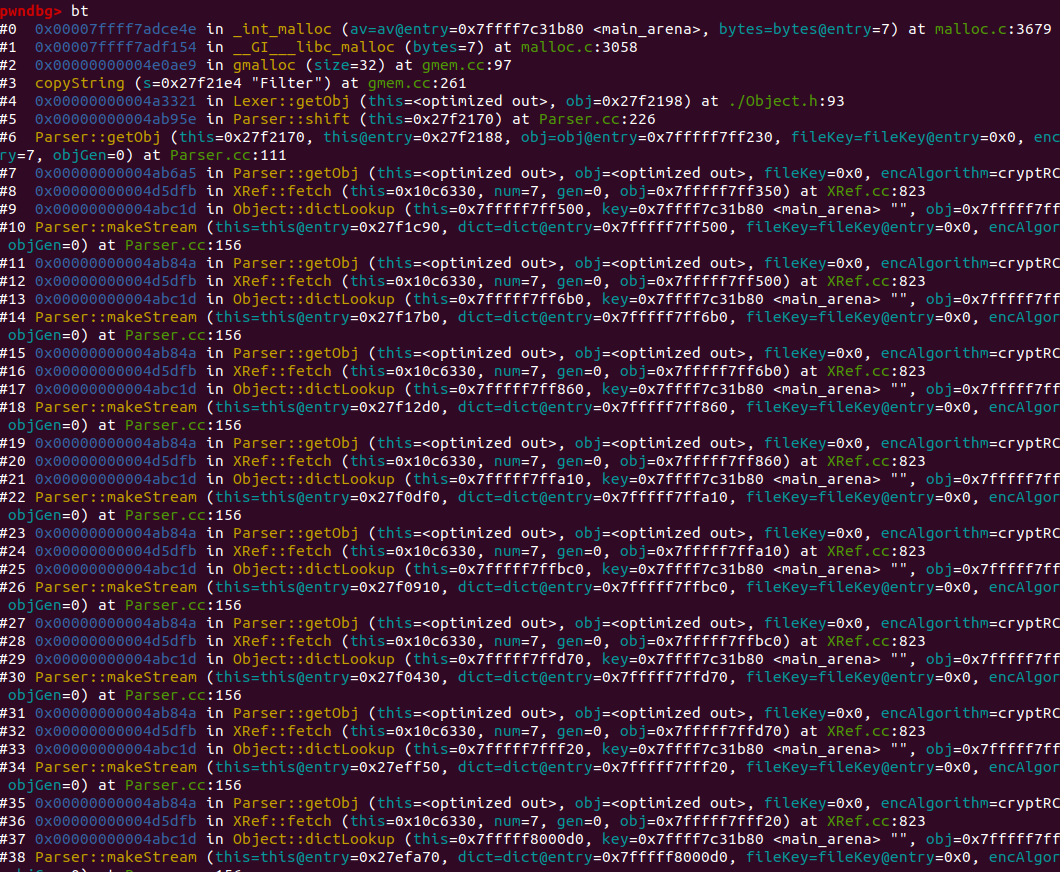
코드를 보면 Parser,XRef, Object 이 3개가 무한으로 도는 모습 그러니까 무한 재귀에 걸려 빠져나오지 못하고 있다.
이렇게 되면 스택 프레임이 할당을 하다 더이상 할당하지 못할 때 Segmentation fault가 발생한다.
CVE페이지에서 냈던 결론과 비교해보면 결국 재귀 떄문에 오류가 발생한다는 것이 일치합니다.
Analize(Hard)
조금 더 심층적으로 분석해봅시다.
다음 명령어를 통해 디렉토리로 이동해줍시다.
cd ~/fuzzing_xpdf/xpdf-3.02/xpdf그럼 Parser.cc 라는 파일이 있는데, 이 파일과 Analize(EZ)에서 진행했던 bt를 비교해가면서 분석하면 더욱
상세한 결과를 얻을 수 있습니다.
결론
오늘은 Fuzzing101에 있는 Exercise 1, afl을 이용하여 xpdf 1-day분석을 진행해보았습니다.
fuzzer를 처음 공부하는 사람, 실제 소프트웨어에 fuzzer를 돌리기 전 공부하기 좋은 자료라는 생각이 듭니다.
본문 중 틀린 내용이 있거나 이해가 되지 않는 부분이 있을 시, 댓글 달아주시면 정말 감사하겠습니다!
출처
https://github.com/Recarrdo/Fuzzing101/tree/main/Exercise%201
https://github.com/antonio-morales/Fuzzing101
'Pwnable > Fuzzing' 카테고리의 다른 글
| [Code-coverage]데몬을 대상으로 한 커퍼리지 측정 환경 구축 (0) | 2025.07.11 |
|---|